
content-marketing
Destination Imagination: A Behind-The-Scenes Look at Transforming Kids Drawings to a 3D Visualisation
Published: 19/08/19 - Updated: 19/08/19
Recently, we released a campaign where we tackle the design challenges of bringing kids drawings to life in a 3D world. How did we achieve this? If this question sparks your curiosity, then here we will have a peek into how we managed to pull it off!
After collecting the kids’ drawings from Ardleigh Green Junior School, lastminute.com chose our winners and then we started the design phase. In order to bring this to life, we needed to consider what we’ll be using and how are we going to do it. Here we will look at how we will reimagine this piece below.
What Programs Did We Use?
As of today, people all over the world have developed a wide range of open-source software options. Rather than spending thousands of pounds on software, thankfully in our present time we have a few good options for competing with industry-standard software. Blender was the main program for 3D modelling and the majority of the work. At Kaizen, we have access to the Adobe Creative Cloud suite too, where Photoshop and Illustrator helped us add the final touches to the piece, but the alternatives would be something like Krita and Inkscape where with enough patience and understanding, you could pretty much achieve the same thing. Read a comparison on Krita vs Photoshop in a previous blog I wrote here.
Resources!
The biggest time savers for me were any “free to use” licenses for creative work such as this one we did. One of the main resources we used was a website called Blendswap, featuring a relatively large collection of 3D assets, all pre-made and ready to work with. To maximise my time, I downloaded some of these models which made sense to the piece, but for those that felt a bit more unique and as a Blender user myself, I modelled and textured some of the harder to find assets.
With the programs ready to be used, we needed to start laying out the basic foundations for our piece. So here we work with the sky, land and sea. The sky was taken from a High dynamic range image (here specifically), again with hundreds of images to choose from, we can pick which one best fits our scene. There was a bright big sun featured in the kid’s design, so essentially we wanted something nice and bright to better reference the drawing. For the trees, I used an asset (created by OliverMH) and modified it a bit, then I created a particle system to spawn it across where I wanted them to grow from.
Asset Creation
Here’s a brief breakdown on how I make the models. We will go over something simple such as the ancient barrel featured in the design. This can be broken into 3 phases; modelling, sculpting, and texturing.
Firstly we model out a rough shape that represents the design. Luckily for us, the barrel design is very easy to work with, so we can start off with a cylinder as our base model. This 3D shape is done automatically as it’s a basic geometric shape.
Creating the Normal Map
We then use this base and sculpt in the rest of the details which changes the topology and adds a great amount of detail on the model which as a result, makes it difficult to texture. There are a few ways to resolve this issue: either we model around our high-resolution model and simplify the amount of faces we have, or we can use an automated program that would do this for us. I imported the high-resolution model into a free third party application called instant meshes. This allowed us to recalculate the model we’ve imported in and simplifies the number of faces so it can be ready for UV texturing after implementing some seams.
But there are consequences to using something like instant meshes. Although it is a lot quicker to have software retopologize something for you, it can also lead to unclean topological meshes which for animation it would be a lot harder to work with. For the purpose of this, we’re only mapping this onto an object so to cut down design time, we used instant meshes. If you ever plan on animating your 3D models, I would use the old school way and model a low poly version over the high-resolution model.
The reason why we do this is we want to bring out the details as much as possible, without our computer having to be slow when we render the final images. This method is called baking normals, where we create a texture that handles all the ‘bumpiness’ and details from the high-resolution model, and bakes it onto our lower resolution model. It is a powerful technique that modern 3D games use today to bring out the most detail in our models while maintaining maximum performance and a more manageable workflow.
Texturing
After that, we can colour the diffuse map using the texture paint mode in Blender and combining it with a bunch of procedurally generated textures and subtle blending or mixing. After a few tweaks, we should get something like this as a result.
For the fire effects, I used a series of png images that were available for free online. Usually you can simulate a fire using a particle system, but for the sake of time and the fact that the final result is a static/still image, it makes the process a lot easier when it comes to faking something in. I mapped the images onto a flat plane and overlapped half a dozen to get something that looks a bit more natural-looking.
For the map, I quickly modelled in some landscape and adjusted the heights of the lands and the sea. While I could have also drawn this in Illustrator or Photoshop, I felt actually doing it in 3D was slightly quicker for me for a decent result. After that, I applied that onto an image plane and modelled the frame around it.
This is, for the most part, my standard workflow for all the other assets I’ve custom created but would mix that alongside with the resources I’ve found on blendswap such as the dragon model by yoji. This is a massive time saver since I don’t have to model, texture and rig it which would have taken me at least a week or more to do alone.
I wanted to also say a huge thanks for those people who do these and allow us to use it freely in our work!
Final Touches
After rendering our scene in Blender, we can work on the final touches as the image isn’t quite finished as some of the colours are slightly washed out. We can use the compositor in Blender to colour correct this, but what I like to do is use this image on something like Photoshop or Krita as we have more control on the cleaning-up process and adding things that take a bit longer to do in 3D (like the seafoam).
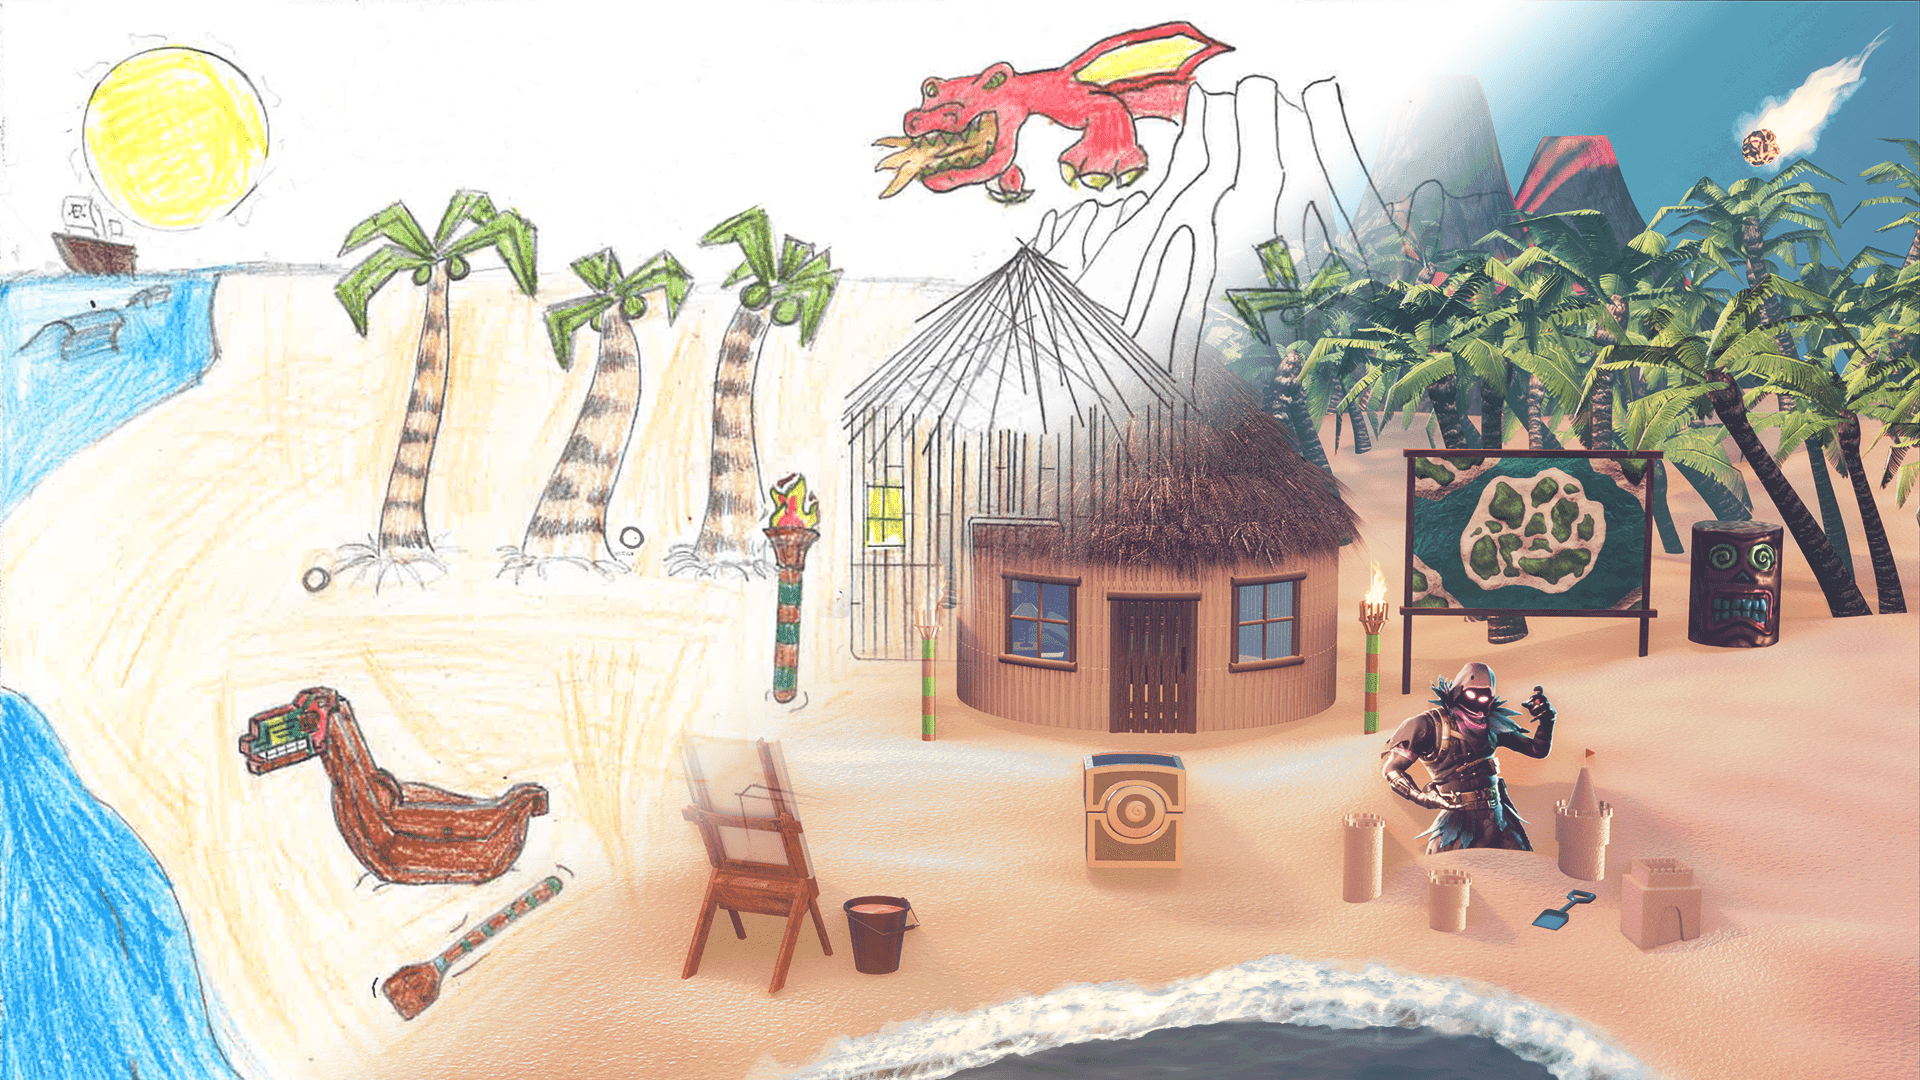
Before and After Image
Here is the finished result for the pirate island. I hope this gives you an insight on how this works and the processes we had to go through to achieve our final drawings for lastminute.com.
3D model credits

Pete Campbell
Pete Campbell started building websites from his bedroom at age 14. After a few years of honing his skills in the industry, Pete founded what we now know as Kaizen. What started as a one-person business run from Pete’s one-bed flat in Dalston has skyrocketed into an award-winning industry trailblazer and one of the UK’s top 50 tech companies as awarded by Deloitte.